on July 13, 2021
This post is part of TSQLTuesday #140, “What have you been up to with containers?"
Disposable databases are indispensable for software developers, both for initial development work and in automation pipelines. Containers pair exceptionally well with temporary databases and provide a lightweight mechanism to spin up an environment on demand.
In this post, I share why we need disposable databases, use cases for disposable databases in automated workflows, and a tutorial to create an Azure DevOps pipeline to spin up an AdventureWorks2019 sample data container on demand using Spawn. Spawn has a free tier which you can try out anytime.

Why we need disposable databases
There are two main reasons why we need disposable databases for software development:
-
Testing database changes requires a realistic dataset. Schema isn’t enough! Will that unique index create successfully in production? Can you add a non-nullable column to that table without a default value? How will this query perform? We need realistic datasets for these scenarios and more.
-
Databases generally don’t have good ways to “reset” after you make changes. I say “good” here because some techniques do exist. SQL Server, for example, has a database snapshot feature. One can create a database snapshot at a point in time, make some changes, and later revert to that snapshot. But this feature doesn’t scale for software development. Database snapshots aren’t portable– they are tightly coupled with the source database. Database snapshots are read-only for a point in time– they are not writeable. The database snapshot feature is also cumbersome to implement and wasn’t designed with automation in mind.
Without disposable databases, it is much harder to do quality testing of changes. It’s also much harder to validate deployments when reordering changes in release pipelines.
A containerized service for ephemeral database containers
Redgate’s Foundry team created Spawn to explore how a containerized service can solve the problems above. The Spawn cloud service lets users:
- Create data images. Your image can be empty, you can create it from scripts, or you can create it from database backups.
- Create data containers from images. These containers can be quickly created, used, and then removed.
These are just the basics. There is a lot more functionality available, including resetting containers and graduating containers to new images.
Two use cases for disposable databases in pipelines
Continuous Integration builds
When your repository contains database code, it’s essential to ensure the code is valid – just like any other code. Disposable databases allow you to automate code validation for your database code whenever someone commits or merges changes into a code branch. Continuous Integration can call a pipeline or action which will:
- Create a data container including the database
- Deploy changes from the repo to the database
- Fail the action or pipeline if the code doesn’t deploy successfully
- Clean up the data container at the end of the job
Pull requests
One example of using a disposable database in an automation pipeline is in a Pull Request (PR) workflow when using Git. In this workflow, a developer will:
- Create a local Git branch
- Make database changes locally to their environment (maybe a disposable database which they spin up just for the branch)
- Save and commit their changes to Git locally using the team’s preferred tooling for the project
- Push their branch up to the central repo
- Create a Pull Request on the central repo to merge the code into a shared branch (commonly “main”)
There is often an option for automation to kick off at this point to validate the code in your branch. Effective automation will save work for the folks reviewing your Pull Request while enabling them to do high quality review of your changes. If you have a database cloning solution, this automation can:
- Create a data container including the database
- Deploy changes from the repo to the database
Optionally, you can keep the database around for the reviewers to inspect as part of the PR review. Many teams prefer to build an entire environment (database, application components, etc.) for use in PR reviews.
Prerequisites to follow this tutorial
All of the accounts, services, and tools used in this tutorial offer free tiers. To follow along, you need:
- A GitHub account to connect to Spawn.
- An Azure DevOps project - the free tier works fine. The project repo can be empty (no database code is required).
- To install the Spawn command line on a computer. This has a few simple steps: log in to the Spawn web app with GitHub, download the Spawn command line executable to a local folder, add the folder to your path, and then run
spawnctl authin a terminal.
Note: We won’t deploy database code to the data container in this tutorial itself, but we’ll set the foundation to do that in a future tutorial.
Create an Azure DevOps pipeline
In this example, I am working with a newly created Azure DevOps project. I’ve initialized the default Git repo with a readme, but I haven’t added any code.
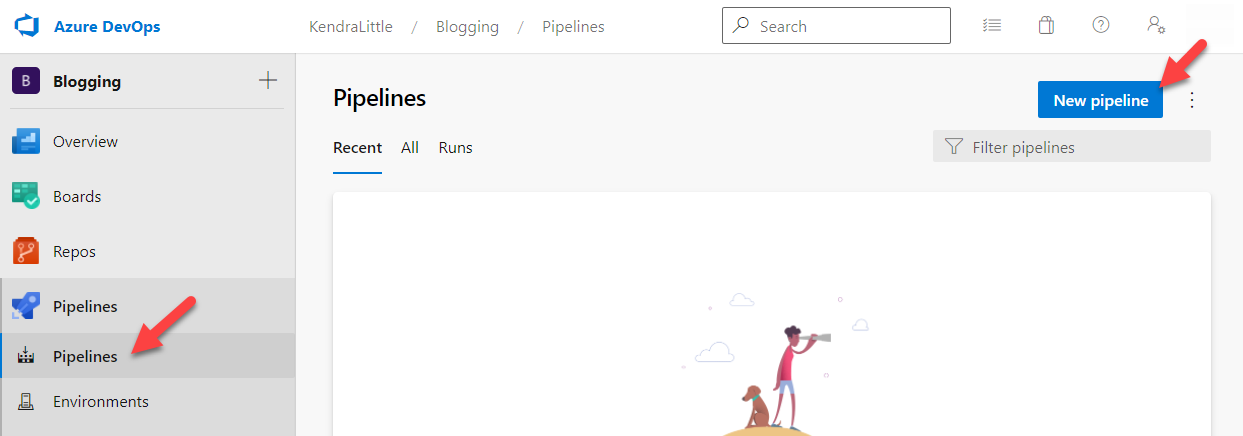
First, click Pipelines in the left menu bar, then click New pipeline at the top right.
At the Where is your code? prompt, click Azure Repos Git. This is a YAML pipeline. (You could also do this process with code stored in Bitbucket Cloud or GitHub.)

At the Select a repository prompt, click on the name of the repo.

Troubleshooting: If you do not see a repo name here and this is a new Azure DevOps project, click on Repos in the left bar. If it says “[YourRepoName] is empty. Add some code!” at the top, one way to get it working fast is to scroll to the bottom of the page and click Initialize with the “Add a README” option ticked.
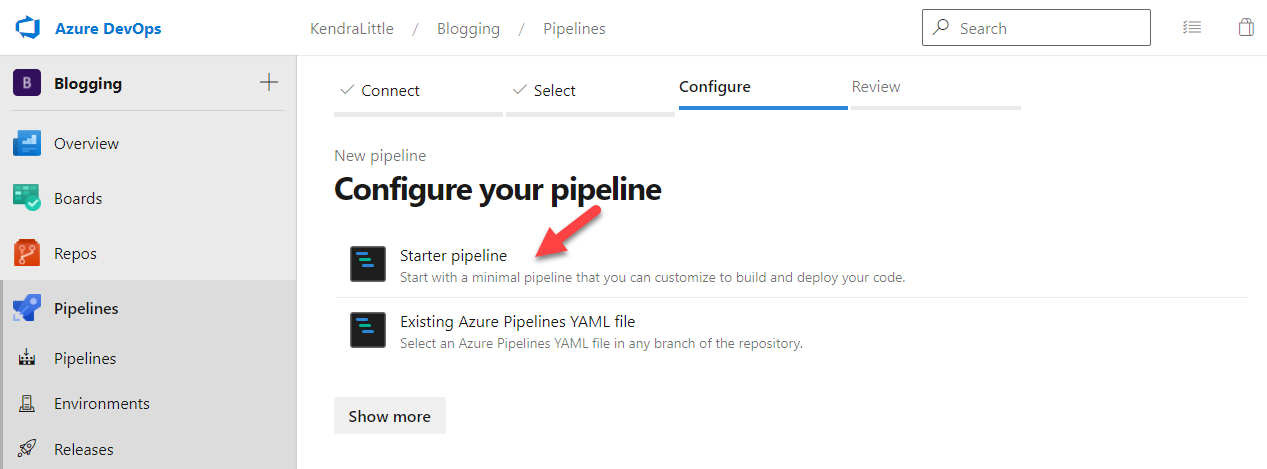
At the Configure your pipeline prompt, select Starter pipeline.
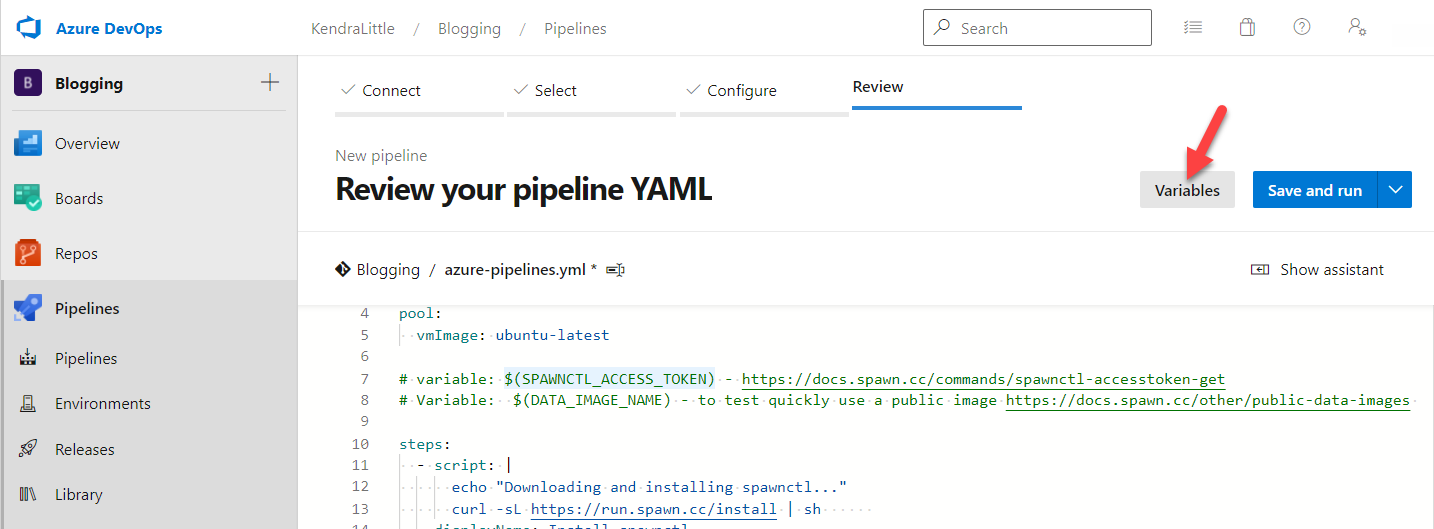
This should bring you to the Review your pipeline YAML screen, with simple starter code in a YAML pipeline.
Add YAML to the pipeline to create a Spawn data container
Our next step is to replace that starter pipeline code with the following YAML. This YAML will…
- Use an Azure-hosted agent running ubuntu-latest
- Download and install the Spawn command line (spawnctl) to the agent
- Create a data container based on the image name specified in a variable named $(DATA_IMAGE_NAME) with a lifetime of 20 minutes
- Authenticate to Spawn by using an access token stored in a variable named $(SPAWNCTL_ACCESS_TOKEN)
trigger:
- main

pool:
  vmImage: ubuntu-latest

# variable: $(SPAWNCTL_ACCESS_TOKEN) - https://docs.spawn.cc/commands/spawnctl-accesstoken-get
# Variable:  $(DATA_IMAGE_NAME) - to test quickly use a public image https://docs.spawn.cc/other/public-data-images

steps:
  - script: |
      echo "Downloading and installing spawnctl..."
      curl -sL https://run.spawn.cc/install | sh
    displayName: Install spawnctl
  - script: |
      set -e
      export PATH=$PATH:$HOME/.spawnctl/bin
      dataContainer=$(spawnctl create data-container --image $(DATA_IMAGE_NAME) --lifetime 20m -q )
      echo "##vso[task.setvariable variable=dataContainerName]$dataContainer"
      dataContainerJson=$(spawnctl get data-container $dataContainer -o json)
      port=$(echo $dataContainerJson | jq -r .port)
      host=$(echo $dataContainerJson | jq -r .host)
      user=$(echo $dataContainerJson | jq -r .user)
      password=$(echo $dataContainerJson | jq -r .password)
    displayName: spawn a database
    env:
      SPAWNCTL_ACCESS_TOKEN: $(SPAWNCTL_ACCESS_TOKEN)
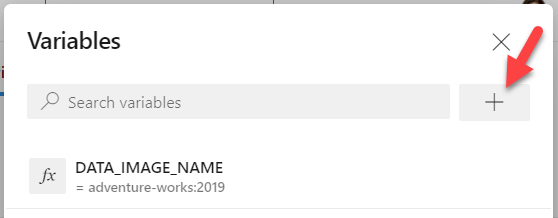
Add variables to your pipeline
On the Review your pipeline YAML screen, click Variables in the top right corner.
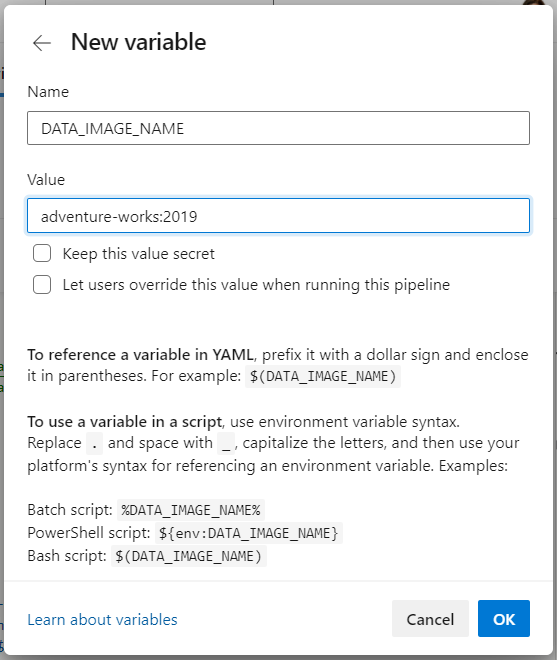
In the Variables pane, click New Variable
Add a new variable:
- Set the variable name to DATA_IMAGE_NAME
- Set the value to adventure-works:2019 – or use the public image of your choice.
Click OK at the bottom of the pane.
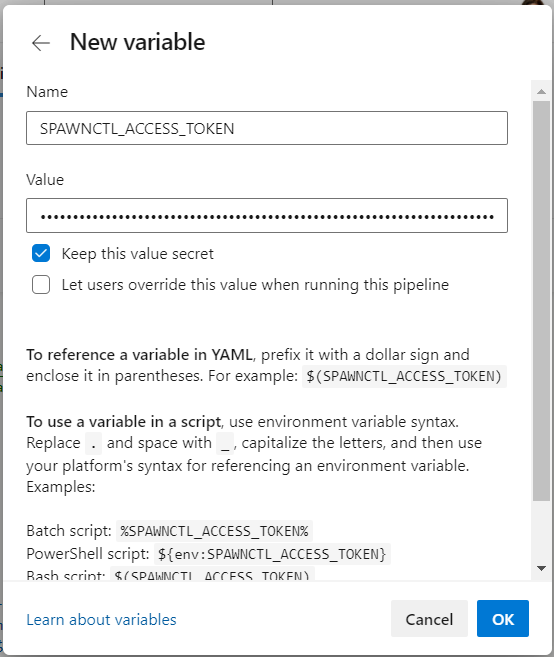
In the Variables pane, click the plus sign to add a second variable.
To get the value for this variable, you need to:
- Install the Spawn command line on a computer, if you have not done so already. (This should be fast: the page guides you to log into the Spawn web app with GitHub, download the Spawn command line executable, save it to a folder, add the folder to your path, and then run
spawnctl authin a terminal.) - Run the following command to create an access token:
spawnctl create access-token --purpose "Spawn access token for pipeline test"
Copy the token from the terminal to your clipboard.
Now, back in the Azure DevOps variables pane, add a second variable:
- Set the variable name to SPAWNCTL_ACCESS_TOKEN
- Past the value of your access token from your clipboard
- Tick off the “keep this value secret” box to protect your access token
Click OK at the bottom of the pane.
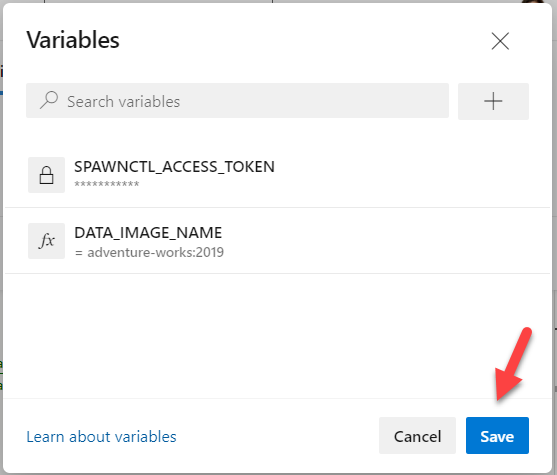
Back in the main Variables pane, click Save at the bottom of the screen.
Save and run your pipeline
As a quick recap, so far we have:
- Created a starter YAML pipeline
- Replaced the code with YAML to work with Spawn
- Added two variables to the pipeline and saved them
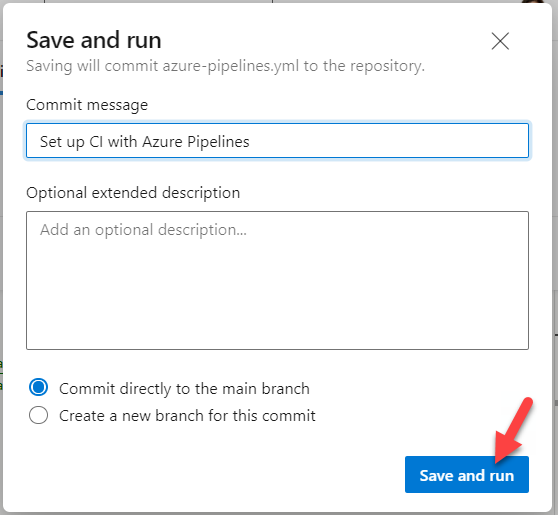
Now we need to save the pipeline itself. On the Review your pipeline YAML screen, click Save and run.
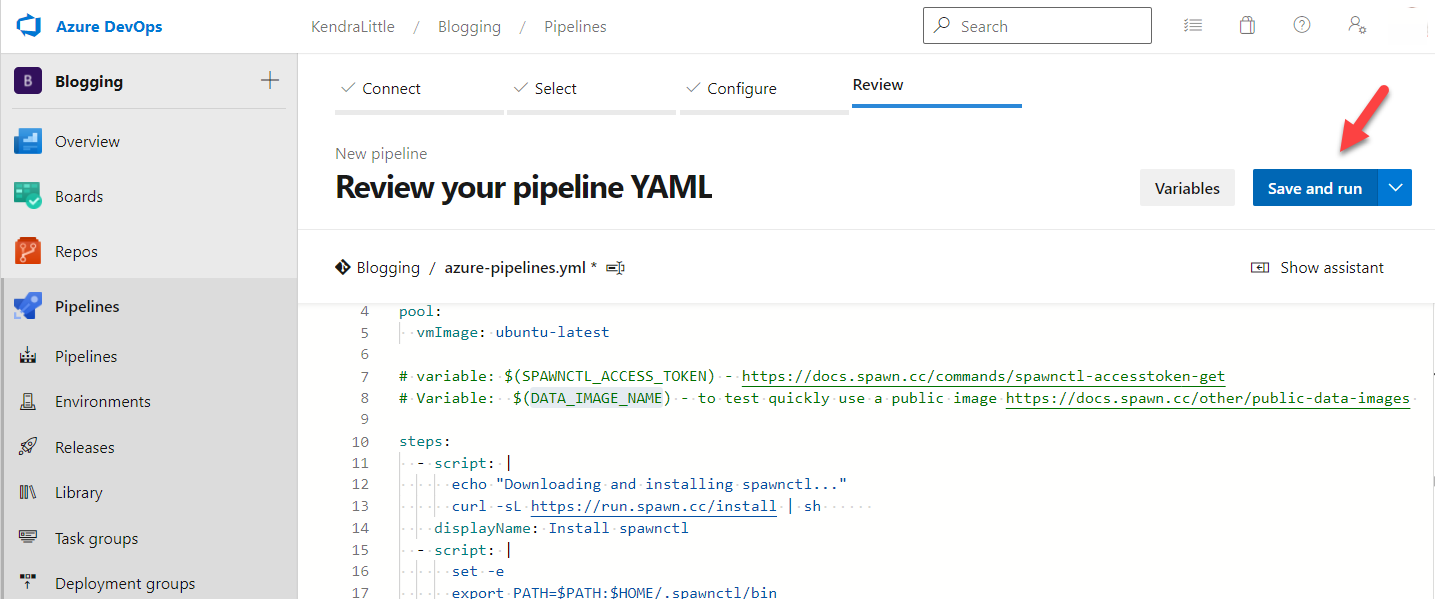
In the Save and run pane which appears, click Save and run in the bottom right corner.
You will now be taken to a screen where you can watch your Pipeline job be queued and then run. If all has gone well, you should see your job succeed in a relatively short amount of time.

Check out the data container created by the Pipeline
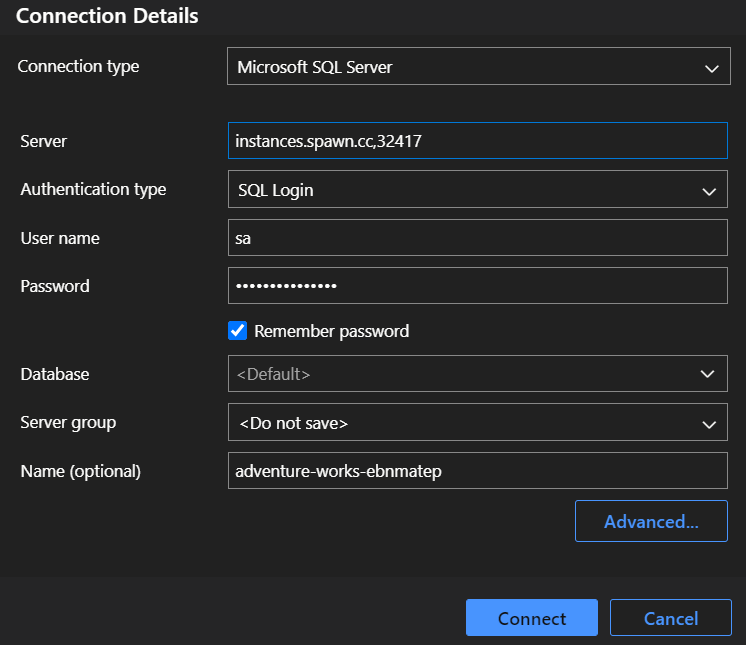
Our pipeline asked Spawn to create a copy of the AdventureWorks sample database with a lifetime of 20 minutes. We can connect to that database in SQL Server Management Studio or Azure Data Studio if we’d like to check it out.
We let Spawn name the database container in this case.
Open a terminal, and run the following command to get a list of all your data containers.
spawnctl get data-containers
This will return a list of your containers with their metadata.

Next, plug the name of your data container into the following command.
spawnctl get data-container adventure-works-ebnmatep -o json
This will output connection information for your database.

Note from the output:
- The Data Source connection string, including the port
- The username is sa
- A random password has been generated
You can use this information to connect to the SQL Server instance using the IDE of your choice.
If you enjoy using Azure Data Studio, the Spawn extension for Azure Data Studio makes connecting to your Spawn instances simple.
Other ways to get started with Spawn
If you’d like to play around with Spawn locally, follow the Spawn Getting Started tutorial.
If you’d prefer to use Spawn with GitHub Actions, there’s a tutorial for that as well.
Thanks for the great TSQLTuesday topic
I’ve wanted to write this article for a while, but I kept not getting around to it. Thanks to Anthony Nocentino for the writing prompt.