on May 5, 2021
SQL Server’s Developer Edition installs with a different default network protocol configuration than Standard Edition and Enterprise Edition.
Fixing this has gotten more complicated because it’s become common for the SQL Server Configuration Manager to not be installed on a developer’s workstation in an easily accessible way.
Many editions of SQL Server install with TCP/IP enabled – but not Developer Edition
If you don’t always work with Developer Edition, it’s easy to forget that it has a different default for the TCP/IP protocol.
This isn’t a bug – Microsoft has documented this (highlighting mine).
| Edition | New installation vs. previous installation is present | Shared memory | TCP/IP | Named pipes |
|---|---|---|---|---|
| Enterprise | New installation | Enabled | Enabled | Disabled for network connections. |
| Standard | New installation | Enabled | Enabled | Disabled for network connections. |
| Web | New installation | Enabled | Enabled | Disabled for network connections. |
| Developer | New installation | Enabled | Disabled |
Disabled for network connections. |
| Evaluation | New installation | Enabled | Enabled | Disabled for network connections. |
| SQL Server Express | New installation | Enabled | Disabled | Disabled for network connections. |
| All editions | Previous installation is present but is not being upgraded. | Same as new installation | Same as new installation | Same as new installation |
| All editions | Upgrade | Enabled | Settings from the previous installation are preserved. | Settings from the previous installation are preserved. |
But increasingly, developers do want to connect to Developer Edition SQL Server instances over TCP/IP. Maybe those development instances are being used for a build or for testing purposes. Or maybe they are simply using a development tool that requires TCP/IP.
To fix this…
1. First, run the program “SQL Server Configuration Manager” (or find it in Computer Management)
Option 1: The traditional way to fix this is in an application named “SQL Server Configuration Manager”, which is (sometimes) installed when SQL Server Developer Edition is installed. You can find this in the Windows Start menu or search bar. If you don’t see the SQL Server Configuration Manager installed…
Option 2: Run the “Computer Management” app. This can be started from the Windows Start menu or search bar. The command line to start this is compmgmt.msc.
Expand “Services and Applications” at the bottom of the left menu.
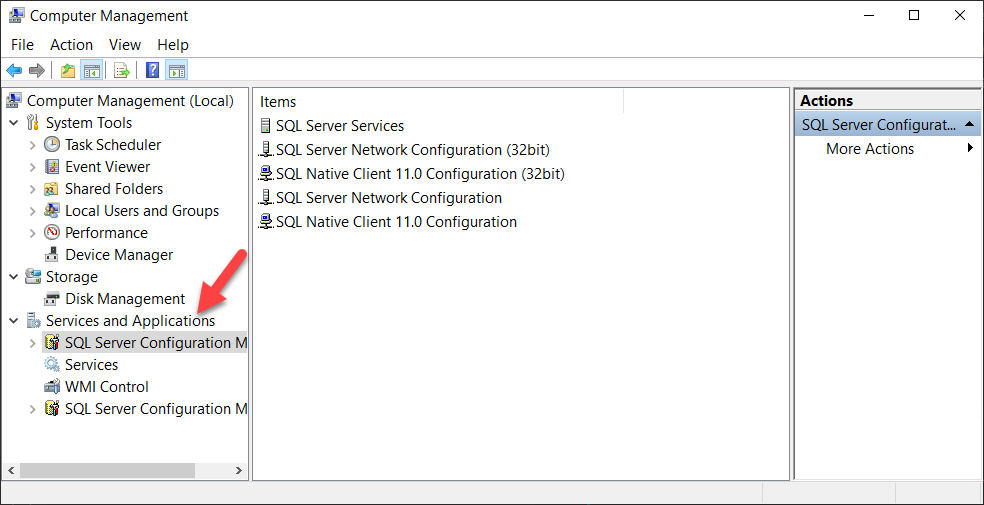
If you have more than one version of SQL Server installed, you will see more than one “SQL Server Configuration Manager” snap-in available. ou generally want to choose the highest version, but to tell which one that is, you will need to click into “SQL Server Services” in each one and see which one lists the most SQL Server instances.
Now you have all the functionality of the SQL Server Configuration Manager in front of you. (It’s just this snap-in.)
Thanks to Chrissy LeMaire for this tip about Computer Management in the comments. I had no idea!
Option 3: If Computer Management doesn’t work for you for some reason, you could also add snap-ins to the Microsoft Management Console:
- From a terminal or the windows search bar, start the Microsoft Management Console by running:
mmc.exe - Go to “File”, then “Add/Remove Snap-in”
- Find “SQL Server Configuration Manager” in the list of available snap-ins and click “Add” to move it to the right
- Click “OK”
If you have more than one version of SQL Server installed, you will see more than one “SQL Server Configuration Manager” snap-in available. You generally want to choose the highest version for the reasons above. This may take some trial and error. You have the option to “Save” your Microsoft Management Console configuration (under the File menu) so it’s easier to re-open your configuration the next time you run MMC.exe.
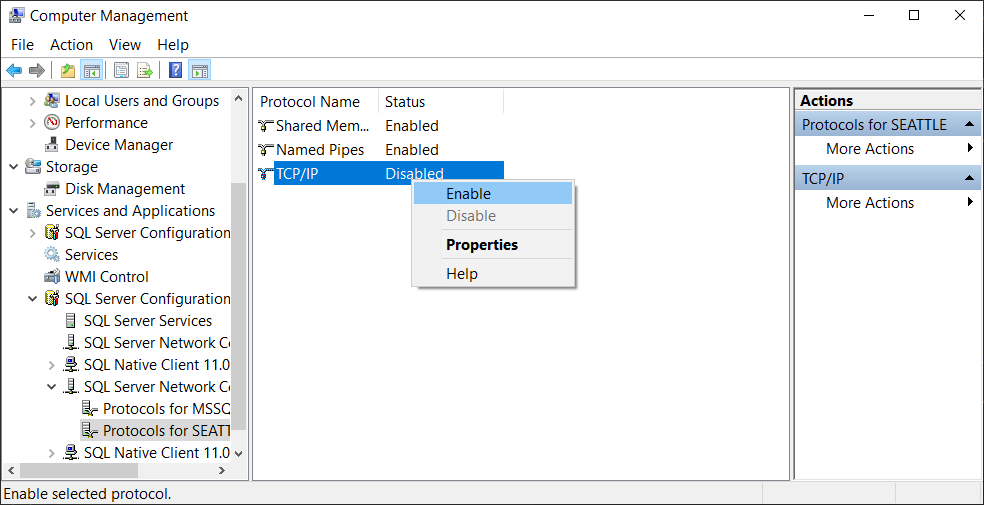
2. Next, enable the TCP/IP protocol for the instance
- Expand “SQL Server Network Configuration
- Click “protocols for <the name of your instance>”
- Find the TCP/IP protocol in the details pane, right-click it, and select “Enable”
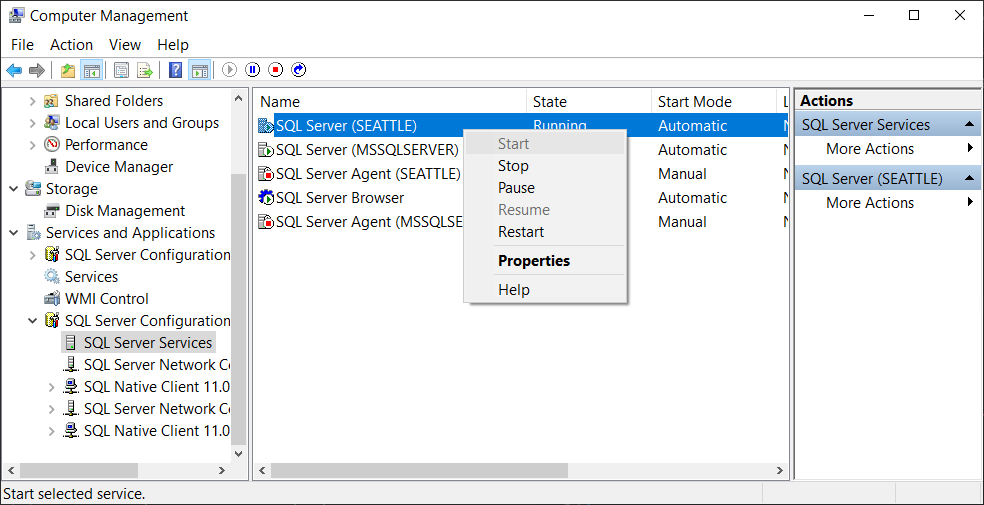
3. Finally, restart the SQL Server Instance
You will see a message that the SQL Server instance needs to be restarted for this to take effect.
- Go to “SQL Server Services”
- In the right pane, right-click the instance to restart
- I typically choose to stop it, wait a beat, and then start it separately – just so if anything fails I know what bit it was on when it hit the problem.
But, why?
This configuration default has never actually made much sense to me, personally. I’ve always worked in environments where it’s been useful to allow remote connections to developer SQL Server instances.
I’ve heard the argument before that it’s more secure to default an instance to this configuration and only enable TCP/IP connections if shared memory / Named Pipes aren’t sufficient. But if that was the case, wouldn’t this be the default for all editions? :thinking:
In any case, this default has been in place for a long time, and I think it’s unlikely to change anytime soon.